Why You'll Love It
- - Minimal effort, maximum comfort
- - No oven needed, just a brief bake
- - Creamy texture that melts on the tongue
- - Versatile topping options for any season
*"The cake was so soft and the poke added a perfect surprise of creamy filling. My kids loved it!"*
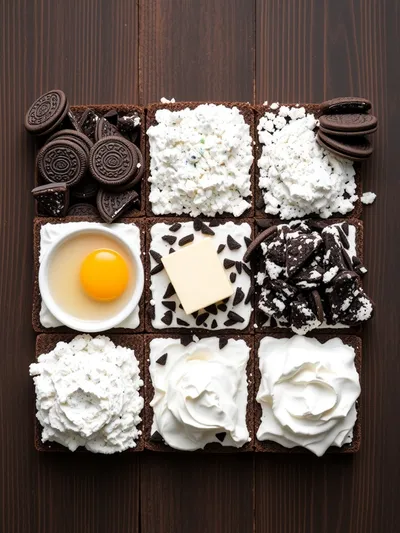
Essential Ingredient Guide
- Oreo cookies: Choose the original chocolate‑cream variety for the most classic flavor; crush finely for a uniform base.
- Cream cheese: Use full‑fat for a richer mouthfeel; let it soften at room temperature before mixing.
- Sweetened condensed milk: Adds a silky sweetness that balances the chocolate bitterness.
- Vanilla extract: A few drops amplify the aroma and tie the flavors together.
- Lemon juice: A splash brightens the cream and prevents it from feeling too heavy.
- Chocolate ganache: A drizzle creates a glossy finish and an extra layer of cocoa depth.
Complete Cooking Process
-
Ingredient Readiness:
Crush the Oreos, soften the cream cheese, and measure the condensed milk so everything comes together smoothly.
-
Flavor Development:
Blend the cream cheese with condensed milk and vanilla, letting the mixture sit briefly to meld.
-
Texture Control:
Press the cookie crumbs firmly into the pan, then poke evenly to create wells for the creamy fill.
-
Finishing Touches:
Pipe the cream mixture into the holes, chill, then drizzle with ganache just before serving.
-
Serving Timing:
Serve after at least one hour of chilling; the cake holds its shape and the flavors settle beautifully.
- Use a food processor for fine crumbs; it saves time
- Don’t over‑fill the poke holes, a little space keeps the texture light
- Chill the cake on a wire rack to avoid soggy edges
- Add a pinch of sea salt to the ganache for depth
Pro Tips
Well, those small adjustments make a world of difference. I remember once forgetting the sea salt and the ganache felt flat—adding it later revived the whole dessert. So, take your time, enjoy the process, and let the cake surprise you.
The essence of the dish:
A fun fact or historical angle:
Flavor or sensory focus:
You Must Know
- Keep the cake refrigerated until serving
- Use a gentle hand when poking to avoid breaking the crust
- Taste the filling and adjust sweetness if needed
Frequently Asked Questions
→ Can I make this cake gluten‑free?
Yes, substitute the Oreo cookies with a certified gluten‑free chocolate cookie or use gluten‑free graham crackers.
→ How long can I store leftovers?
Keep the cake refrigerated in an airtight container for up to three days; the texture remains pleasant.
→ Can I use a different flavor of Oreos?
Absolutely—mint, peanut butter, or double‑stuf all work, just adjust the filling sweetness accordingly.
→ Do I need to bake the crust?
No baking is required; pressing the crumbs into the pan and chilling sets the base.
→ What’s the best way to poke the holes?
Use a clean wooden skewer or the handle of a wooden spoon; gently press until the crumbs rise.
→ Can I freeze the cake?
Freezing is not recommended because the cream filling may separate; it’s best enjoyed fresh.
Chef's Tips
If the crust feels crumbly, add a little more melted butter.,For a nutty twist, sprinkle toasted almonds on top.,The cake can be made a day ahead; just keep it refrigerated.
Nutrition Facts
per serving
320
Calories
5g
Protein
34g
Carbs
18g
Fat
Taste Profile
Rich chocolate‑vanilla with a bright citrus hint
Ingredient Substitutions
Don't have an ingredient? Try these alternatives
Leaves a lighter texture; strain to remove excess water.
Provides a similar color with less caffeine.
Recipe Variations
Try these delicious twists on the original
Spicy Version
Add a pinch of cayenne and drizzle with a chocolate‑chili ganache.
Mediterranean Style
Swap the chocolate ganache for a honey‑yogurt drizzle and garnish with toasted pistachios.
Common Mistakes to Avoid
Learn from others' mistakes for perfect results
- Over‑filling the poke holes, which makes the cake soggy
- Skipping the chill step, leading to a crumbly crust
- Using melted butter that’s too hot, which can soften the cookies prematurely
Meal Prep & Storage
Make Ahead Tips
You can prepare the crust and filling a day ahead; keep them separate, then assemble and chill just before serving.
Leftover Ideas
Refrigerate leftovers and enjoy within two days; the texture stays pleasant if kept chilled.
Perfect Pairings
Serve this with...
Cooking Timeline
Crush cookies and mix with butter; press into pan.
Poke holes and whisk filling ingredients together.
Fill poke holes with cream mixture; smooth surface.
Chill cake in refrigerator.
Prepare ganache and drizzle over chilled cake.
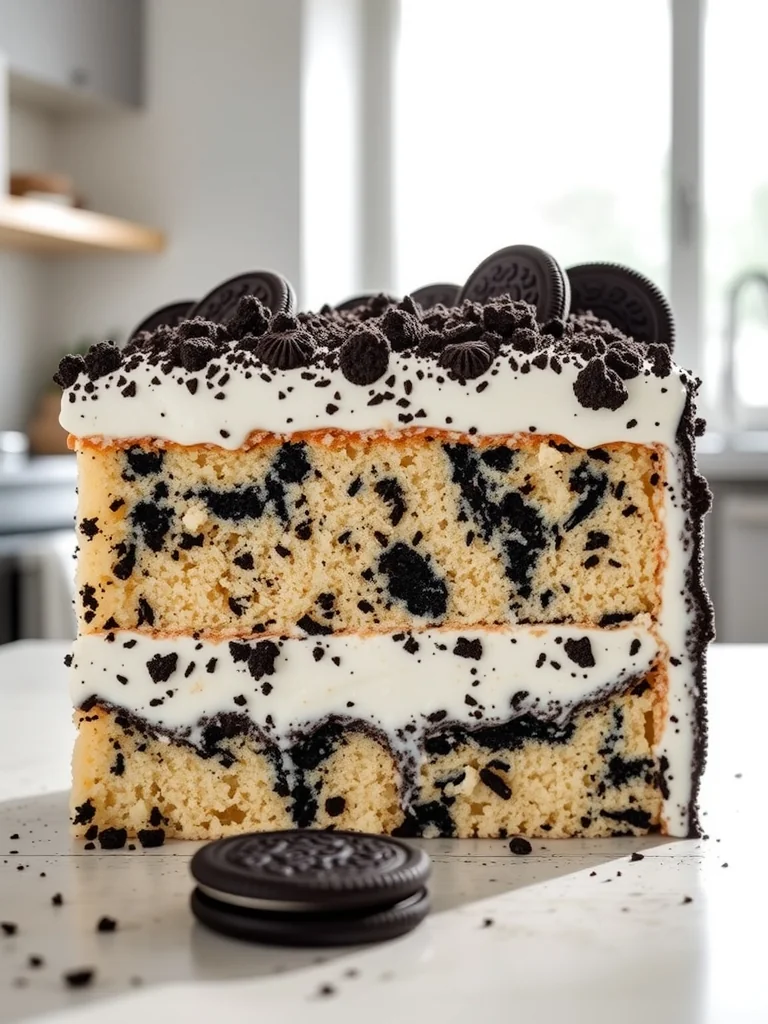
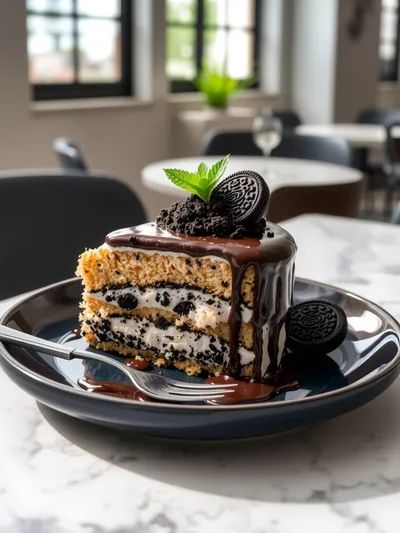
Oreo Poke Cake
A quick, creamy Oreo poke cake that feels like a cozy hug, with crumbly cookie base, silky vanilla cream, and a gentle poke of chocolate drizzle.
Timing
Prep Time
15 Minutes
Cook Time
10 Minutes
Total Time
25 Minutes
Recipe Details
Ingredients
Base
- 01 2 cups (about 24) Oreo cookies, crushed
- 02 5 tbsp unsalted butter, melted
Filling
- 01 8 oz cream cheese, softened
- 02 1/2 cup sweetened condensed milk
- 03 2 tbsp lemon juice
- 04 1 tsp vanilla extract
- 05 Pinch of sea salt
Topping
- 01 1/2 cup heavy cream
- 02 2 tbsp cocoa powder
- 03 2 tbsp chocolate chips
Instructions
Crush the Oreos into fine crumbs; you can use a food processor or place them in a sealed bag and roll with a rolling pin.
Mix the crumbs with melted butter until evenly coated, then press the mixture firmly into the base of a 9‑inch springform pan.
Using a thin skewer, gently poke a grid of holes about 1‑inch apart across the crust.
In a bowl, whisk together softened cream cheese, sweetened condensed milk, lemon juice, vanilla, and a pinch of sea salt until smooth.
Spoon the creamy mixture into each poke hole, spreading any excess over the surface, then chill the cake for at least 1 hour.
Meanwhile, melt chocolate chips with heavy cream and cocoa powder over low heat to create a ganache; drizzle over the chilled cake before serving.
Notes & Tips
- 1 If the crust feels crumbly, add a little more melted butter.
- 2 For a nutty twist, sprinkle toasted almonds on top.
- 3 The cake can be made a day ahead; just keep it refrigerated.
Tools You'll Need
-
Food processor or resealable bag
-
9‑inch springform pan
-
Spatula
-
Mixing bowl
-
Whisk
-
Small skewer
Must-Know Tips
- Don’t over‑fill the poke holes, a little space keeps the texture light
- Let the cream cheese sit out for 30 minutes to avoid lumps
- Chill the crust before poking to prevent cracks
Professional Secrets
- Room temperature cream cheese ensures a silky filling
- Press the crust firmly with the back of a spoon for uniform density
- A quick chill sets the base without drying it out

Recipe by
JenniferJennifer is a seasoned food blogger and recipe creator who brings a fresh, home‑cooked vibe to Lancefood’s ever‑growing collection of dishes. With ove ...
Get Delicious Recipes Weekly
Join 25,000+ home cooks getting our best recipes straight to their inbox.
Free forever • No spam • Unsubscribe anytime